Pages

Friday, August 23, 2013

Summer Berry Salad

 $6.75 total / $1.13 per serving


Everything in this salad is delicious and nutritious. I took advantage of summer's bounty by combining two kinds of berries, which boosts the nutritional value of the salad. Berries can get expensive, however, if you buy them in season you can find them at a much better cost. I happen to procure all of this lovely produce in my weekend Co-Op order for a steal.


Nutritional Highlight: Blueberries. Known as a superfood, blueberries are excellent for brain health due to their high antioxidant content. Research is suggesting that blueberries also can be good for memory. Berries are a nutritionally dense food. For having so few calories, they offer a wide range of benefits stemming from their fiber, vitamin, and antioxidant benefits

Summer Berry Salad  serves 4-6
Don't mind the cantaloupe, that was for dessert!

1 head of Romaine, washed and chopped
1/2 Cucumber, peeled and diced
6 or 7 Strawberries, washed and sliced
1/2 Cup Blueberries, washed
2 Grilled Chicken Breasts, sliced *optional
Brianna's Poppy Seed Dressing


Mix all ingredients, except dressing, in a large bowl or keep ingredients separate to have family members build their own salad.

I chose to separate all of the ingredients. I just liked how they looked in different colored bowls! It also made it easy for everyone to have every kind of produce on their plate while controlling the amount of chicken.

Dress your salad with about 2 Tbsp of dressing.

Enjoy!


Nutritional Analysis:

Per Serving: 287 calories, 16.2g fat, 14g carbohydrates, 19.2g protein. Very high in Vitamin A, Vitamin C, Folate, Niacin and Vitamin E. High in Vitamin B-6, Iron, Phosphorus and Selenium.

Thursday, August 8, 2013

Mango Chicken

$6.30 total / $1.05 per serving

I keep getting mangoes in my Co-Op order! Last time, I was delighted to make my mango salsa because we had invited company over for dinner. Since mangoes are not usually on my grocery list, it has become one of my special occasion recipes. Apparently that has changed and now I need to come up with some new mango recipes. (Although I don't think my husband would complain if we kept having grilled chicken with mango salsa every week!)

This recipe is delicious and looks beautiful - all the qualities of a great dinner for guests. The best part though? It is incredibly EASY. Your guests will never guess how fast this dinner is to put together.

Nutritional Highlight: Mango. There are so many health benefits to consuming mangoes that I am so happy they are coming in my order every week! Mangoes are loaded with polyphenolic antioxidants to protect the body against cancer, filled with fiber and enzymes to improve digestion and lower cholesterol, as well as contain specific acids that help to alkalize the body. Oklahoma State University did a research study on mangoes and suggested that they may be able to control blood sugar levels and reduce body fat. Mangoes also have benefits associated with their high amounts of Vitamins A, C, and E!


Mango Chicken  Serves 4-6

2 Boneless Skinless Chicken Breasts, chopped
2 Mangoes, diced*
2 Green Onions, diced with green and white parts separated
2 Garlic Cloves, minced
1 cup Jasmine Rice
1 Tbsp Oil
3 Tbsp Soy Sauce
1 Tbsp Lime Juice
1/4 tsp Sriracha Sauce
1/4 tsp Red Pepper Flakes

*Dicing a mango is tricky at first. Here is how I do it. Cut the Mango into three sections (stand the fruit upright and cut off each side so there is just a thin middle section where the seed is.) With the skin still on, cut into the fruit to create a tic tac toe pattern, making sure not to pierce through the skin. Using both hands, hold the edge of the fruit with your fingers, skin facing you. With your thumbs pressing on the skin, invert the fruit so the cubes are popped out. Now you can slice of the cubes at the base of the skin with your knife!

Boil 1 1/2 cups water in a medium pot, add rice and reduce heat to medium low. Cover and cook 15 minutes or until water is absorbed.

Meanwhile, heat oil in a skillet or wok to medium high. Saute garlic and the white part of the green onion for about 45 seconds. Add the chicken and brown on all sides. Add the soy sauce, lime juice, sriracha and red pepper flakes; cook for 10 minutes or until chicken is cooked through. Stir occasionally.

Add the mangoes and the rest of the green onions. Cover to heat through. (Try not to stir the mangoes to retain their beautiful color. They will absorb the sauce mixture and turn brown if mixed in.)

Serve over the rice.

Nutritional Analysis:

Per Serving (3/4 cup rice, 3/4 cup mango chicken): 241.5 calories, 3g fat, 33.6g carbohydrates, 19.8g protein. High in Vitamin A, Vitamin C, Folate, Manganese and Thiamin.

Wednesday, July 31, 2013

Philly Cheese 'Steak' Sandwiches

$7.45 total / $1.86 per sandwich

Having just bought a house, Jake and I are really sticking to our monthly grocery budget. We are also sticking with buying food from our local Co-Op. We can get a box of groceries for $27 every week; each share includes meat and produce. It's been a wonderful solution to helping keep our budget intact while also keeping me on my toes as to what we'll have. It's not pizza every night in this house! (Although, if we HAD to have grilled pizza EVERY night, I think Jake and I would get by :D Yum!) Anyway, this recipe is just me getting creative with the ingredients we had on hand. For a true Philly Cheese Steak sandwich, you'll want to buy steak and slice it extra thin instead of the hamburger used here.

Nutritional Highlight: Grass Fed Beef. Does it really matter? The answer is a resounding YES!!! Cows naturally eat grass. When cattle are fed corn and soy products, their digestive tract becomes acidic resulting in higher numbers E Coli strains within their system. The reason corn and soy products are so attractive to feedlot owners is because they are subsidized, which make them cheap, and they also make the cows fat in a short amount of time. Both of those create a larger payout. However, cows that are grass fed are healthier. They require little to no antibiotic treatment and their meat does not have to be sterilized with ammonia (that's what is happening to your meat from a CAFO - Read this: NY Times Article)! Grass fed beef also tastes better! Sorry to get you all grossed out but we can't assume that the food we eat is 'natural' any more. Many food products are processed/changed in some way when you don't realize they are. 

 
Philly Cheese 'Steak' Sandwiches   (serves 4)

4 Hoagie Buns
1 lb. Lean Ground Beef
1 Green Bell Pepper, seeded and sliced into strips
1 Red onion, cut into strips
4 Slices Provolone
Butter

Heat a large skillet to medium high. Cook the hamburger until about 3/4 of the way through. Add the peppers and onions. Cook until the beef is all the way browned and the vegetables are softened. Drain off any excess fat. Lay provolone slices on top of the beef and vegetable mixture, cover and take off the heat.

Butter the hoagie buns, and toast on a different skillet set to medium. You may have to spray the pan first with Pam just to make sure the buns don't stick and it creates a nice crust. I had a bit of trouble with one of mine!

Once the buns are toasted and the cheese is melted, you can use tongs or a spoon to layer up your sandwich!

Nutritional Analysis:

Per Sandwich: 570 calories, 16.4g fat, 59.5g carbohydrates, 29.8g protein. High in calcium and iron.

Wednesday, July 24, 2013

Garden Fried Rice with Chicken

$5.80 total / $0.73

I've been getting food from my local food co-op for several months and it is always so fun to make up recipes after getting a surprise mix of fruits and vegetables from our standard share. This week we got a head of broccoli, some carrots, and zucchini, among other things, in our order. I was delighted after I realized that I still had some eggs, peas and green onions that I needed to use. My dinner menu practically made itself with what I had on hand. I love it when things come together like that!

Nutritional Highlight: Loaded Up On Vegetables. Fried rice is one of those things that can really be horribly fattening and full of calories. It can, however, become a vehicle to get your kids (or your husband) to eat a variety of vegetables all at once! I have 5 different kinds of nutritious vegetables packed in this recipe, four of which are GREEN. Play around, be creative. There really is no 'wrong' way to make fried rice. You can put in whatever you like or whatever you have on hand. 

Pictured: 2 cups 
Garden Fried Rice with Chicken
Serves 6-8


4 cups cooked rice, chilled
1 Tbsp vegetable oil
4 scallions, chopped, white & green parts separated
3 cloves garlic, minced
1 medium zucchini, diced
3 medium carrots, peeled and diced
1 small head of broccoli, cut into florets
1 cup peas
1/2 lbs chicken breast, cut into small pieces
2 eggs
1/4 cup soy sauce
1/4 tsp sesame oil
1/2 tsp sriracha sauce


Heat wok and oil to medium high, then add the white part of the scallions along with the garlic. Cook, while stirring, for 30 seconds. Add all additional vegetables except the green scallions. Toss to coat and cook for 2-3 minutes for the vegetables to soften.

Add in the chicken, soy sauce, sesame oil and sriracha. Mix all ingredients and cook, turning occasionally for 5 minutes, or until chicken is cooked through. Now its time to add the rice. Mix well and try to get most of the rice towards the bottom side of the wok. Reduce heat to medium and let the rice sit and cook for about 5 minutes without stirring to make the rice crispy.

Increase heat back to medium high. Make a well in the center of the wok and break in two eggs. Scramble the eggs while they cook. When the eggs are almost set, mix in with the rest of the ingredients. When eggs are fully set, mix in the green tops of the scallions for garnish and you are ready to eat!

Nutritional Analysis:

Per 1 cup serving: 185 calories, 4.1g fat, 30.7g carbohydrates, 4.5g dietary fiber, 6.9g protein. High in Vitamin A, Vitamin C, Folate, Manganese, and Phosphorus.

Wednesday, July 17, 2013

BBQ Chicken Grilled Pizza

$4.43 total / $0.56 per serving

Who would have thought to grill pizza? I really don't remember where this inspiration came from but what I can tell you is that it is an absolute brilliant idea. It has turned into my favorite way to eat pizza at home. At first, the thought of putting floppy dough onto the grill without burning myself seemed daunting and I thought I would fail miserably. It's honestly not that bad. The hard part is keeping the dough from folding onto itself. So, my husband and I tried several other ways to make that process easier and we came up with a keeper. Lucky for you, I have it all worked out here and ready to present to you!

Nutritional Highlight: Grilling. Cooking foods on the grill is an easy way to pack in a lot of flavor without any additional fat. However, charring meats can release compounds within the proteins that can be carcinogenic, so be careful not to turn the grill up too high. Grilling also takes far less time than other cooking methods. Bonus!


BBQ Chicken Grilled Pizza  (makes 4 pizzas)

Favorite Pizza Dough
Red Onion
1 Chicken Breast
BBQ Sauce
Cheddar Cheese
Cilantro
Olive Oil
Foil

Prepare the pizza dough about 2 hours in advance.

Heat grill to medium-high.

Once the grill is to temperature, place chicken on the grill. Cut the red onion into thick slices horizontally, keeping the rings intact. Brush both sides of the onion with olive oil. Place onions on the grill with the chicken. Flip chicken over after 10 minutes of cooking, then brush with BBQ sauce. Use tongs to flip the onions over after chicken is flipped. Chicken will cook another 10-15 minutes until done.

Let the chicken and onion rest 5 minutes before slicing into bite size pieces. Prep all of your toppings for the pizza.

Meanwhile, prepare the dough for grilling by rolling it out on a floured surface and stretching to the desired width. Tear off a piece of foil for each pizza. Place the stretched dough on top of the foil and brush the top side of the dough with olive oil. Place the dough onto the grill with the foil still underneath it. Once the dough starts to bubble, use a spatula to flip it over off of the foil.

Now is the fun part. You want to dress your pizza as quickly as possible. Brush with BBQ sauce, layer with chicken, onions, and cheese. Finally top with cilantro. The dough will set up rather quickly. Go ahead and turn the grill off and close the lid to allow the cheese to melt. Remove from the grill after a couple of minutes and enjoy!


Nutritional Analysis: (this is tricky because it will really depend on the type of BBQ sauce as well as the quantity of sauce and cheese you put on your own pizza. I will use the calorie count for how I make mine.)

Per 1/2 pizza:  246 calories, 7.8g fat, 30g carbohydrate, 15.55g protein. High in Vitamin B-6, Calcium, Niacin, Phosphorus, and Selenium

Wednesday, July 10, 2013

Nectarine Muffins

$3.03 total / $0.26 per muffin

Summer is such a wonderful time for so many different things, but one of my favorites is all of the summer harvesting of berries and other tasty fruits that only ripen in the summer heat. There is nothing better than when I can finally get my hands on some nectarines! I love them so much. There is one thing about them though... Once they ripen, you have a small window of sweet tangy deliciousness before they start to bruise and go bad. Don't stress out too much. I came up with a recipe to make use of those nectarines that have seen better days. If there is nothing better than a ripe nectarine then there is nothing worse than having to throw out several that went bad before I knew it!

Nutritional Highlight: Nectarines. Foods that are brightly colored in red, orange and yellow (plant foods...sorry, cheetos don't count!!! :D) have a wonderful nutrient called Beta-Carotene, which is very important in human health. Beta-Carotene helps the body to produce Vitamin A, which is crucial in maintaining function of the immune system as well as your sight. Another important nutrient found in nectarines is lutein, an antioxidant that helps protect the body from damage to the skin and eyes through fighting free radicals in the body.


Nectarine Muffins (makes 12 muffins)

1 1/2 cups flour
3/4 cups sugar
1/2 tsp salt
2 tsp baking powder
1 Tbsp brown sugar
1 tsp cinnamon
1/4 tsp nutmeg
1 Tbsp vanilla
1/3 cup vegetable oil
1/3 cup milk
2 eggs
3 ripe nectarines, pitted and diced (cut out bruised spots, if needed)


Preheat the oven to 375°; grease your muffin pan.

In a mixer or large bowl, combine all ingredients except fruit. Mix well. Fold in diced fruit.

Fill muffin tins with 1/4 cup scoop of batter. Sprinkle tops with brown sugar.

Bake 18 - 20 minutes.

If you can, let them cool. Enjoy!

(These are best right after you bake them. If you need to store them overnight, the fruit may cause them to get soggy. They are still delicious but the texture is changed somewhat.)


Nutritional Analysis:

Per 1 muffin serving: 203 calories, 7.2g fat (.8 saturated, 2g polyunsaturated, 3.8g monounsaturated), 32.5g carbohydrates, 3.6g protein. High in Vitamin E, Calcium, Folate, Iron, Manganese, Niacin, Phosphorus, Riboflavin, Selenium, and Thiamin.

Monday, June 10, 2013

Heartbreak & Home Ownership

I have been so looking forward to the summer.

For months I anticipated the end of the semester when I could take a break from school and have the freedom to do with my time as I pleased. As April came, I was overwhelmed by final projects, exam preparations, and buying my first home but I knew the end was near. Soon I would be able to rest.

Then, I began to feel sick. Every day I would feel a bit of nausea and fatigue. I contributed it to stress and tried to ignore it. In the back of my mind I thought, "Could I be pregnant? No, no I don't think so."

Once the bleeding started I knew something was wrong. I tried waiting it out, just in case, but going into the second week I knew I shouldn't wait any longer. Something just didn't feel right. I made an appointment with my doctor and he got me right in.

Then it happened. The nurse came in and told me I was pregnant.

I didn't know whether to smile and laugh or to cry. I wasn't sure how to feel.  I didn't want to become too attached to the idea of having a baby. I knew there was a major possibility this pregnancy wouldn't last.

Once you hear those words; once you see it in writing and see the hormone levels indicating how far along you are...there is really no coming back from that. The attachment starts there. I tried so hard to keep my distance. It didn't work.

The next four weeks were long and drawn out. I spent almost every day in the hospital for a few hours to get my blood drawn to check my pregnancy hormone levels. At first they went down, but then they doubled. I felt like I had this pregnancy taken away from me and then given right back. I allowed myself to hope.

Eventually we found out that I had a tubal pregnancy. It was one of the worst pieces of news I have ever received. I prayed that if God needed this child more than I did, that he would take it. That I wouldn't have to decide when to end it. I prayed for a miscarriage. As crazy as that sounds, I did. I wanted his will to be done but I didn't want to be a part of it. The longer I waited, the more dangerous the pregnancy was for me. I hated it. All of it.

There is a verse in Isaiah that says, "When you pass through the waters, I will be with you; and through the rivers, they shall not overwhelm you; when you walk through the fire, you shall not be burned, and the flame shall not consume you."

I remember feeling like I was fighting against the current just to live through the day. That each day, the waters were getting higher and higher. I was up to my chin with my own tears and all of the physical and emotional pain. I was exhausted but I had also encountered a strange sense of peace. I knew I would get through it, I just had to keep moving. I just had to keep praying.

It's been almost 10 weeks since I found out I was pregnant and some days are still difficult but I am keeping busy. My husband and I closed on our first house and have been moving in and decorating for a month now. That has helped a lot.

I'm starting to feel like myself again. I think the change of the season is helping as well.


With Love,
Jess

(I have hopes to start posting recipes again soon!)

Saturday, March 9, 2013

I'm trying to give myself some grace . . .

I will be putting up a couple posts at the beginning of next week!

Life is really crazy at the moment with midterms, working extra hours, and trying to keep my sanity. :) I love this blog and plan to continue to post to it. However, it will probably be only once or twice a week for a while until summer break.

I get in these patterns where I try to do everything all at once AND I want to do them all perfectly. Do you ever do that? I just run myself into the ground because I don't want to give anything up!

Sadly, I have to pull back on something and because this blog is 'extracurricular', I have to be responsible and lower my standards for how many posts I can put up.

Feel free to follow me on Facebook so you know when I post a new recipe or if I quickly share a meal or two in between posts.

Thank you all for the amazing support and encouragement throughout this process! It has really been amazing. I am eagerly awaiting summer so I can share more delicious money saving recipes!


With Love,
Jess

Wednesday, February 27, 2013

Pot Stickers & Vegetable Stir Fry

$12.50 total / $2.05 per serving
($7.67 for Pot Stickers @ $0.85 per serving, $4.83 for Stir Fry $1.20 per serving)

This is one of those recipes that I love to make in large batches and freeze the extras for quick meals during the month. I love pot stickers, so it is only appropriate that I have them on hand at all times in my freezer. :) These little babies require a little time to put together but are oh so worth it! Don't even get me started on the dipping sauce......seriously. If I could, I would put it on top of everything! Oh wait, I do...

I typically make a double batch of the sauce and then freeze it in an extra ice cube tray so I have little individual sized servings ready to go! The pot stickers freeze beautifully as well and make weekday dinners effortless. I hope you enjoy these as much as I do!

Nutritional Highlight: Ground Turkey Breast. Turkey is an obvious substitution for ground beef when you are looking for something a little less fatty with the same functionality as beef. You can substitute ground turkey in any recipe that ground beef is called for, just make sure to read the label. You want to make sure you are buying ground turkey breast, not a mixture of light and dark meat. If you aren't careful, you can end up with just about as much fat as lean ground sirloin. Ground turkey also contains more calcium than ground beef but does contain less iron. 


Pot Stickers & Vegetable Stir Fry  (Pot Stickers: serves 9, Stir Fry: serves 4)
adapted from Everyday Food


  • For The Dipping Sauce

    • 1 cup soy sauce
    • 1/2 cup plus 2 tablespoons white vinegar
    • 2-3 Tbsp Sriracha sauce
    • 1/4 cup sugar
    • 2 tablespoon grated peeled fresh ginger
    • 2 tablespoon toasted sesame oil
    • Scallion greens (optional), for garnish
  • For The Pot Stickers

    • 2 scallions, cut into 1-inch pieces
    • 1 medium carrot, diced medium
    • 1 large egg white
    • 1 pound ground turkey (or ground pork**very tasty!)
    • 1/4 cup dipping sauce
    • 36 wonton wrappers
    • Nonstick cooking spray

    For The Stir Fry

    • 2 scallions, cut into 1-inch pieces
    • 3 medium carrots, sliced into strips
    • 1 large head of baby bok choy, washed and large stems discarded
    • 1 medium onion, sliced
    • 1 cup mushrooms, sliced
    • 1/4 cup dipping sauce
    • vegetable oil

    • In a medium bowl, whisk together soy sauce, vinegar, Sriracha, sugar, ginger, and sesame oil; set dipping sauce aside.

    • Make pot stickers: In a food processor, process scallions, carrot, egg white, and half the turkey until a paste forms. Transfer to a medium bowl. Mix in the remaining turkey. Stir in dipping sauce.

    • Working with one wonton wrapper at a time, place 1 scant tablespoon meat mixture in center. With a wet finger, moisten edge of wrapper, then fold over filling and press to seal. Cover filled dumplings with a kitchen towel while you work.

    • Lightly coat a large nonstick skillet with cooking spray and heat over high. In batches, cook dumplings until golden brown on both sides, 1 to 2 minutes per side. Carefully add 1/2 cup water to skillet, cover, and cook until water has almost evaporated and dumplings are tender, 3 minutes. Uncover and cook until remaining water evaporates (reduce heat to medium if dumplings are overbrowning). Transfer pot stickers to a plate. Wipe skillet clean between batches. Add scallion greens to dipping sauce if desired and serve alongside pot stickers.

    • Meanwhile, heat up a couple tbsp of vegetable oil in a stir fry pan. When the oil starts to smoke, add the carrots and onion. Cook the vegetables until tender, stirring almost constantly, about 5 minutes. Add in the rest of the vegetables except the bok choy. Once the mushrooms are cooked, reduce heat to low add in the bok choy. Let the pan cool a bit before adding the dipping sauce so you don't get a splatter of sauce everywhere. Mix in the dipping sauce and serve. 

    • **Lay the extra uncooked pot stickers on a cookie sheet and place in the freezer until frozen - 30 minutes to an hour. Once they are frozen, you can transfer them to a big ziplock freezer bag to enjoy at your convenience! Just heat them up in the skillet with the same method although adding 2-3 minutes per side. Typically takes about 10 minutes to cook when frozen.**

    Nutritional Analysis:

    Per serving (4 potstickers and 1 cup stir fry): 243 calories, 1.5g fat, 33.2g carbohydrates, 20.1g protein and high in Calcium, Vitamin A, Vitamin B-6, Vitamin C, Fiber, Iron, Manganese, Magnesium, Niacin, Phosphorus, Potassium, Riboflavin, Selenium and Thiamin

Wednesday, February 20, 2013

Spaghetti Squash with Marinara and Mushrooms

$6.22 total / $1.56 per serving

I made this a couple weeks ago for my friend on her birthday. I was going to take her out but once I learned she was on a strict diet, I thought it would be more fun to make her something. I came up with this little dinner and it turned out delicious! I absolutely love spaghetti squash, you can do so much with it. This recipe is really simple and simply treats it as the 'noodle' base for basic spaghetti with mushrooms.

Nutritional Highlight: Spaghetti Squash. This squash is an excellent addition to any diet plan. Per serving, it is low in calories, has a fair amount of fiber and boasts many vitamins and minerals. The water content also helps to fill you up. It can be eaten plain with salt and pepper or used as a substitute for pasta like I've done in this dish. 

Spaghetti Squash with Marinara and Mushrooms  (serves 3-4)

1/2 Marinara Sauce recipe
3 cups Mushrooms, cleaned and sliced
1 Spaghetti Squash, about 3 lbs.
4 cloves Garlic, minced
1 Tbsp Butter, unsalted
2 Tbsp Olive Oil
Salt and Pepper
Parmesan Cheese, for serving


Make the marinara as directed or reheat on the stove if made previously. Preheat the oven to 375º and bake the entire spaghetti squash on a sheet pan for 1 hour. Let the squash cool for 10 minutes.

While the squash is cooling, heat a skillet to medium and melt 1 Tbsp butter. Add the mushrooms. Let the mushrooms cook until softened, about 5 minutes. Add 2 minced cloves of garlic and continue to cook for another 10 minutes or so until the mushrooms are cooked.

Once the spaghetti squash has cooled, cut it open lengthwise, take the seeds out and use a fork to scrape out the inside of the squash. Either wait until the mushrooms are done and then transfer them to a bowl and cover, or grab a different skillet. Pour 2 Tbsp olive oil in the pan, then add the remaining garlic. Cook the garlic until fragrant but not burnt, about 1-2 minutes. Place the spaghetti squash in the skillet with the butter and garlic, toss until coated. Season with salt and pepper.

Plate with the spaghetti squash first, about 1-2 cups, then with 1 cup marinara and about 1/2 cup mushrooms. Sprinkle with parmesan and eat!

Nutritional Analysis:

Per serving: 311 calories, 12.7g fat (3.9g saturated, 1.4 polyunsaturated, 6.6 monounsaturated), 40.8g carbohydrates, 9.1g protein and over 15% daily value of Vitamin A, Vitamin B-6, Vitamin C, Vitamin E, Calcium, Copper, Iron, Magnesium, Manganese, Niacin, Pantothenic Acid, Phosphorus, Riboflavin, and Thiamin

The Best Marinara

$5.57 total / $0.80 per serving


This is the most flavorful marinara I have ever tasted. It is absolutely delicious! I found this recipe in 2008 when I was working at a Credit Union. Our branch had just opened up downtown and no one knew we were there so I had A LOT of downtime. Luckily for me, I enjoy browsing recipes and seeing what sounds good to try out. I struck gold with this recipe. It's from Mary E. Ross and her cookbook Lighten Up - The Art of Low Fat Gourmet Cooking. I think the secret to the flavor of this sauce is the addition of red bell pepper. Not only does the bell pepper give the sauce a depth of flavor but it also boosts the nutritional value of this already nutritious sauce. That's a win in my book!

Nutritional Highlight: Red Wine. In moderation, red wine can be healthy for your heart and other parts of your body due to its high antioxidant count. There are more polyphenols, a type of antioxidant found in phytochemical bearing plant foods, in red wine than there is in blush or white wines. A large portion of the polyphenols in red wine are found in the tannins. In addition to polyphenols, red wine also contains resveratrol, an antioxidant known for its ability to help combat the effects of saturated fat on your heart and arteries.

The Best Marinara   (makes 6-7 cups)
source: Mary E. Ross

1 cup dry white or a light bodied red wine (I like to use Pinot Noir if I have it or Red Cooking Wine works as well)
2 6 oz. cans tomato paste
1 28 oz. can ready cut roma or regular tomatoes or 2 lb. fresh roma or regular tomatoes, peeled and seeded
1 medium red or yellow onion, chopped 
1 red pepper, chopped
2 large cloves fresh garlic, pressed or minced
2 to 3 tablespoons fresh basil (1 tablespoon dry)
1 tablespoon fresh oregano (1/2 tablespoon dry)
1 to 2 tablespoons sugar
1/2 teaspoon salt
1/2 teaspoon garlic powder
6 to 8 shakes chili powder or cayenne pepper
fresh ground black pepper to taste
1/2 teaspoon extra virgin olive oil
Olive oil cooking spray

Spray a 4 quart stock pot with olive oil cooking spray and preheat on medium. Sauté garlic 2 to 3 minutes or until lightly golden. Add tomatoes and all remaining ingredients, except fresh basil and olive oil.

Simmer sauce for 1 to 4 hours. Add basil and olive oil to sauce a few minutes before end of cooking time. If sauce becomes too thick add a little water or wine.

**The only thing I do differently than Mary is that before I serve the sauce, I blend all of the ingredients. You can do this by scooping the sauce into the blender or with a hand held immersion blender. For me, this makes the sauce better. It is a wonderfully thick, rich marinara. You get a little bit of everything in each bite without chunks of tomato or red bell pepper.**

**This will also freeze really well if you want to save some or double the recipe for delicious slow-cooked marinara on busy week nights!**

Nutritional Analysis:

Per 1 cup serving: 125 calories, .8g fat, 23g carbohydrates, 3.6g protein and over 15% daily value of Vitamin A, Vitamin B-6, Vitamin C, Copper, Iron, and Manganese

Monday, February 18, 2013

Pear & Gorgonzola Pizza

$1.17 total / $0.59 per serving


Some things sound like a weird combination but are actually destined to be combined. For me those are typically a sweet and savory combination like cranberry sauce with turkey or applesauce on potato latkes. So when I went to a restaurant and they were serving this pizza, I was skeptical while also intrigued. Once I took a bite, though, all of my doubts vanished. This combination is delicious!

Nutritional Highlight: Pears. High in fiber and several vitamins and minerals, pears are an important fruit to eat during the fall and winter months when they are in season. Pears also contain folate, which is especially important for pregnant or nursing mothers. Another important characteristic of pears is that they contain the trace element boron, which helps the body absorb calcium and magnesium more efficiently. **Enjoy this pizza with a side salad made with spinach or arugula to maximize your calcium absorption** 

Pear & Gorgonzola Pizza (Serves 1-2)

1/4 recipe pizza dough
1/2 Bartlett Pear, thinly sliced
1/2 cup Mozzarella, finely shredded
2 Tbsp Gorgonzola, crumbled
Drizzle of Olive Oil

Prepare the pizza dough as directed, here. Let dough rest 15 minutes. If pizza dough is frozen, allow 24 hours thawing time.

Preheat oven to 475º.  Roll out the dough on a flour surface until thin. Lift the dough up and lightly pull to stretch the dough. Lay dough out on a pizza pan or sheet pan.

Drizzle dough with olive oil. Layer pears, gorgonzola and mozzarella.

Bake at 475º for 10 minutes or until browned and bubbly.


Nutritional Analysis: 

Per serving (1/2 pizza): 315 calories, 15.8g fat (5.9g saturated, 1g polyunsaturated, 7.1g monounsaturated), 30.4g carbohydrates, 12.5g protein and over 15% daily value of Folate, Selenium and Thiamin

Wednesday, February 13, 2013

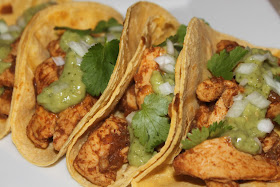
Weeknight Chicken Tacos

$4.47 total / $1.12 per serving

Some days I am just exhausted after work. Really. I feel like I need to just sit on the couch and stare ahead with all of the lights off just to recuperate. Maybe that's just me! (It sounds a bit extreme as I type it out, but it's the truth!)

Maybe you don't quite relate with me, but I'm sure most of you at least don't feel like making something labor intensive for dinner after a long day. Well, I feel you! I also have an answer for you: Chicken Tacos. These little babies are super quick and easy. You'll literally be ready to eat within 20 minutes!


Nutritional Highlight: Cooking with your spice rack. How do you make flavorful food without any fat? Spices! Spices are also an easy way to add additional vitamins and minerals to your meal. Many spices also contain essential oils, oil derived from individual plants, which are beneficial for a variety of health concerns. For example, cumin helps to aid digestion and ease insomnia due to its levels of Vitamin B, thymol and its own essential oil.

Weeknight Chicken Tacos (serves 3-4)

1 lb. Boneless Skinless Chicken Breast, cut into thin strips
1 cup Onion, chopped and divided
1/2 cup Water
1 tsp Cumin
1 tsp Coriander
1 tsp Chili Powder
1/4 tsp Salt
Fresh Cilantro, for serving
Corn Tortillas, for serving
Creamy Salsa Verde, for serving

In a large skillet over high heat, cook the chicken and most of the onions - you'll want to reserve just a small amount for topping the tacos. Immediately, add the spices to coat chicken and onion, stir and cook until the spices are fragrant. Reduce heat to medium and add the water. Simmer for 12 minutes until most of the liquid is absorbed and the chicken is cooked.

Meanwhile, heat corn tortillas over medium heat in a small pan. You can heat up about 3 at a time and then transfer to a warm plate with a damp paper towel to cover.

When you are ready, layer chicken and onion mixture onto a corn tortilla and top with raw onion, cilantro leaves and creamy salsa verde.

Nutritional Analysis:

Per serving (2 tacos dressed as shown): 162 calories, 5g fat, 23.9g carbohydrates, 7.3g protein

Sunday, February 10, 2013

January Budget Breakdown

January Total: $117.76


 (This cart totals $41.73)

Life is crazy at the moment! Phew......I needed to take a breath. Thanks for bearing with me!

Last month was really unique because I started buying locally for the first time! It was also crazy busy as I started another semester at school and began working part time again. As a result of all of these changes, I ended up leading a pretty disorganized month in regards to grocery shopping. I went to the store 6 times in January, which is a ton for me! Two of those trips were to pick up our share at the Co-op and also to their market.


(This bag totals $5.84)

We ended up being very successful last month because I had quite a bit of food that needed to be used in the freezer. We were able to use up the rest of our pork loin, some vegetables and our entire cookie dough stash! I think the other contributor to our success was our new addition of buying food at the local Co-op. The food is so cheap there! I have been pleasantly surprised in both the prices and the quality of the food I've received.

Here is a breakdown of my purchases for the month of January:

Grocery Store
Measurement Item Price
2 lb bag  Coffee $9.98
1 bag Cereal $2.98
1 package Wonton Wrappers $2.59
4 gallons Milk $10.05
2 18 count Eggs $5.18
1 carton Orange Juice $2.99
2 Chobani Yogurt** $0.70
1 Store Ready Pizza** $6.99
2 loaves Whole Wheat Bread** $3.34
1 jar Artichoke Hearts $1.22
1 can Pumpkin Puree $2.09
2 cans Garbanzo Beans $1.36
1.36 lbs Quinoa* $5.21
.89 lbs Bowtie Pasta* $1.03
2.75 lbs Bread Flour* $1.36
.28 lbs Grated Parmesan* $1.05
2.53 lbs Whole Wheat Flour* $1.19
.27 lbs Walnut Halves* $1.53
1.09 lb Cereal* $2.15
1 bunch Green Onions $0.59
3 Roma Tomatoes $0.83
1 lb Spaghetti Squash $2.66
2 lbs Carrots $0.78
1 Pineapple $2.98
1 pint Grape Tomatoes $1.28
2 Roma Tomatoes $0.44
2 Yellow Bell Peppers $0.96
1 Cucumber $0.48
1 Cream Cheese $2.56
4 Sticks Unsalted Butter $2.78
1.5 lb Sliced Turkey Breast $5.59
Total $84.92
*Bulk Item
**Sale Item
Co-Op Purchases
Standard Share: $27.00
1 Loaf Stone Ground Honey Wheat Bread
2 lbs Hardwood Smoked Bacon
2 lbs Boneless Skinless Chicken Breast
2 lbs  Lean Ground Beef
4 Granny Smith Apples
4 Bartlett Pears
2 Lemons
2 Tangerines
2 Oranges
5 lb bag Idaho Potatoes
5 lbs Onions
1 carton Mushrooms
2 lb bag Carrots
1 bunch Celery
Market Buys: $5.84
1 package Nature Jim's Organic Sprouts
1 bunch Bananas
1 Avocado
1 Red Grapefruit
3 Bartlett Pears
3 Lemons
2 Red Bell Peppers
1 Lime
Grand Total $117.76